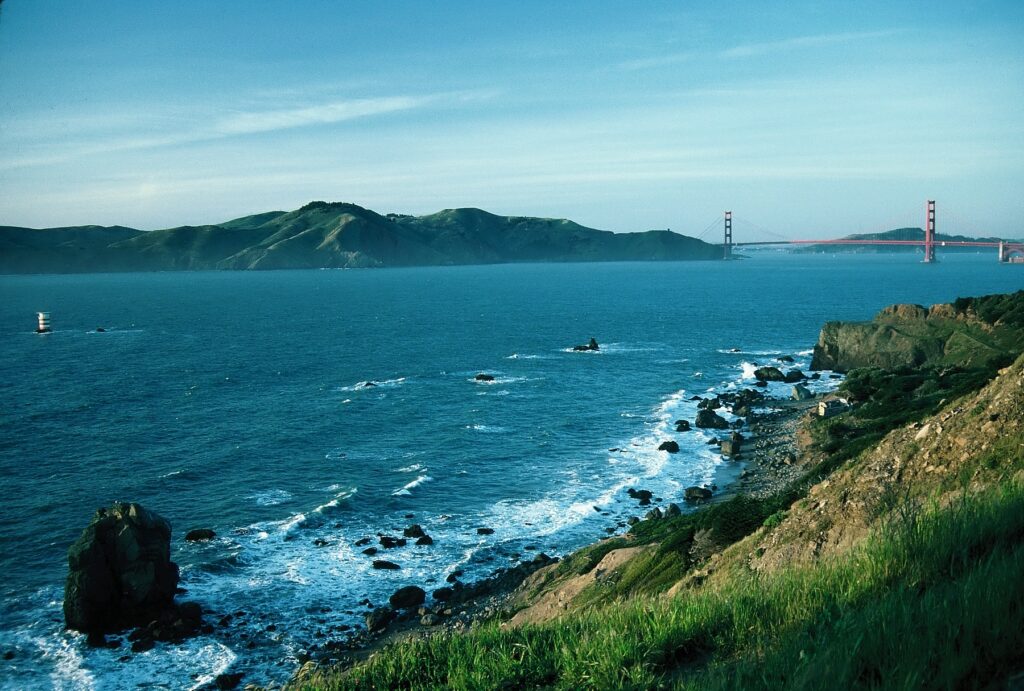
The coastline near Lands End creates natural depth, while the Golden Gate Bridge gives the distant horizon a recognizable focal point.
Framing the Coastline: Beginner Tips for Capturing Stunning Panoramic Views
A beautiful coastal photograph is about more than fitting as much scenery as possible into the frame.
My approach: find a strong viewpoint, build depth from foreground to horizon, keep the frame organized and let natural lines guide the viewer through the landscape.
How Do You Photograph a Panoramic Coastal View?
Start from a safe elevated viewpoint when possible, include foreground elements for depth, keep the horizon level, use natural lines to guide the eye and leave enough space around distant landmarks so the coastline still feels expansive.
Coastal landscapes can look simple when you are standing in front of them: water, sky, shoreline and perhaps a distant landmark.
The challenge is turning that enormous view into a photograph that still gives the viewer a sense of space, distance and place.
The photograph featured in this guide was made near Lands End in San Francisco, looking across the Pacific with the Golden Gate Bridge visible through the marine haze.
What makes the scene work for me: the coastal ridge creates the foreground, the water carries the eye deeper into the photograph and the bridge gives the distant landscape a recognizable destination.
Coastal Photography at a Glance
Use Elevation to Reveal the Coastline
An elevated viewpoint can help a beginner show the shape, scale and layers of a coastal landscape in one frame.
Whenever it is safe and permitted, look for cliffs, bluffs, overlooks, hills or elevated trails.
Height gives you a broader field of view and often makes the relationship between land and water easier to see.
At Lands End, the elevated coastal ridge creates a natural foreground while the Pacific stretches toward the Golden Gate Bridge in the distance.
That separation between near and far subjects creates much more depth than a photograph containing only open water and sky.
Safety comes first: Never step beyond barriers, climb unstable rocks or move toward an unsafe cliff edge for a better composition. Work with the safe viewpoint available to you.
Build the Photograph in Layers
One of the easiest ways to make a wide landscape feel three-dimensional is to give the viewer something near, something in the middle and something in the distance.
Think of a coastal scene as three visual layers:
Foreground: rocks, cliffs, plants, beach grass, a path or another nearby element.
Middle ground: water, shoreline, waves, boats or another part of the landscape that carries the eye deeper into the photograph.
Background: distant cliffs, islands, mountains, bridges, skylines or the horizon itself.
You do not need all three layers in every photograph, but looking for them can help a huge landscape feel less flat.
Four Ways to Strengthen a Coastal Landscape
Use the Coastline as a Leading Line
A curving shoreline, bluff, trail or line of waves can naturally lead the viewer from one part of the photograph toward another.
Keep the Horizon Straight
A noticeably tilted ocean horizon can distract from an otherwise strong photograph. Use your camera or phone grid when it helps.
Give Landmarks Room to Breathe
If a bridge, lighthouse, skyline or other landmark appears in the distance, resist the urge to zoom so tightly that you lose the landscape surrounding it.
Decide What Deserves the Most Space
If the sky is dramatic, include more of it. If the shoreline, reflections or foreground create the stronger story, give more of the frame to the landscape below the horizon.
Use Small Elements to Make a Big Landscape Feel Bigger
A person, boat, bridge or distant building can give the viewer a reference point for understanding the size of the landscape.
A sweeping coastline may feel enormous when you are standing there, but scale can disappear when that scene is reduced to a photograph.
Including one recognizable element helps restore that sense of proportion.
The Golden Gate Bridge plays that role in my Lands End photograph. It is not the largest element in the frame, but its familiar size helps communicate the distance between the viewpoint and the far side of the scene.
People walking a coastal trail, a sailboat offshore or a lighthouse on a distant point can serve the same purpose.
Work With the Light You Find
Coastal photography does not require a perfect blue sky or dramatic sunset.
Early morning and later afternoon light can add warmth, dimension and texture to cliffs, beaches and waves.
Strong midday light can produce glare on the water and deep shadows, so watch your exposure when photographing in bright conditions.
If you use a camera that accepts filters, a polarizing filter may help reduce some reflections and glare depending on your position relative to the sun.
But do not automatically dismiss haze, fog or cloud cover.
Marine haze can soften distant objects and create atmospheric depth, while fog can completely change the mood of a familiar coastline.
Let Marine Haze Create Distance
Haze is not automatically a photography problem. It can help separate the layers of a landscape and show how far away the background really is.
In my Lands End photograph, the Golden Gate Bridge does not appear with the crisp contrast it might have on a perfectly clear day.
Instead, it sits deeper in the scene behind layers of coastline and atmospheric haze.
That softer distance helps communicate the enormous scale of the Pacific view.
Before trying to eliminate every trace of haze through editing, ask whether the atmosphere is actually part of what the scene looked and felt like.
Wide-Angle Photo or Panorama Mode?
A panoramic-looking photograph does not have to be made with your phone or camera’s panorama feature.
When the Entire Story Fits in One Frame
Choose a normal wide photograph when you can include the important foreground, coastline and distant subject without awkwardly cutting off the scene.
This is often easier to compose, easier to keep level and more flexible for websites, prints and social media.
When the View Truly Extends Beyond the Frame
Panorama mode can work well for a coastline stretching far to the left and right, a long mountain range or another scene that cannot be represented effectively in one standard frame.
Move slowly and smoothly, keep the device level and watch for moving subjects that may create stitching errors.
My preference: Do not use panorama mode simply because the landscape is large. First look for a strong composition within a normal frame. Use the panoramic format when the width itself is essential to the story.
How to Take a Better Coastal Panorama With Your Phone
Keep the phone level, rotate your body smoothly instead of swinging only your arms, and move slowly enough for the camera to record each section of the scene cleanly.
Before starting, decide where you want the panorama to begin and end.
Plant your feet securely, especially near overlooks or uneven terrain, and make sure you can complete the movement without stepping sideways.
Keep the horizon as level as possible while following the on-screen guide.
Watch for people, birds, boats and waves moving rapidly through the frame. Because the phone records different parts of the scene at different times, moving subjects can appear distorted or duplicated.
Make more than one panorama when the opportunity allows. Small changes in speed or alignment can make a noticeable difference.
Steady the Camera Before You Worry About Gear
Stability matters whether you are using a DSLR, mirrorless camera or smartphone.
For an ordinary coastal photograph, hold the camera securely and take a moment to settle yourself before pressing the shutter.
A small tripod can be useful in lower light or when you want repeatable framing, but it is not required for a beginner to create a strong coastal landscape.
If you are making several photographs to stitch together later, maintaining a consistent position becomes especially important because large changes between frames can make the final panorama difficult to assemble cleanly.
Do not sacrifice safety for stability. Never balance yourself, a tripod or expensive equipment on an unstable cliff edge, wet rock or other dangerous surface.
Photograph the Big View—and Then Look Closer
A panoramic photograph establishes the place, but smaller details often complete the travel story.
After making the wide landscape, look again.
Photograph waves breaking against rocks, birds along the shore, distant boats, textured cliffs, beach grass, signs, trail details or architectural elements nearby.
The wide photograph explains where you were.
The smaller photographs can help explain what it felt like to explore the location.
This is especially useful when you are documenting a destination rather than making only one standalone landscape image.
Let the Landscape Tell You Something About the Place
The strongest coastal photographs do more than prove you saw the ocean—they show something about what made that particular coastline memorable.
Include elements that are specific to the destination.
A bridge, lighthouse, trail, fog bank, fishing boat, unusual cliff formation or person walking through the landscape can give the photograph context.
At Lands End, the Golden Gate Bridge immediately connects the Pacific coastline to San Francisco while the marine haze reflects the conditions I actually experienced.
That combination tells more of the story than a photograph of open ocean alone.
Build Stronger Travel Photographs Beyond the Coast
Panoramic coastal photography is one specific composition challenge.
For broader guidance on light, composition, equipment, storytelling and photographing different situations while traveling, visit my complete Travel Photography Tips guide.
Common Coastal and Panoramic Photography Mistakes
A huge view can be surprisingly difficult to organize inside a small rectangular frame. These are the problems I would watch for first.
Trying to Include Everything
A wide view still needs a clear composition. Remove distracting areas when they do not help tell the story.
Ignoring the Foreground
Nothing but distant water and sky can make a scene feel flat. Look for something nearby to establish depth.
Tilting the Horizon
Coastal horizons make even small tilts noticeable. Use your grid and check the image before leaving.
Centering the Horizon Automatically
Decide whether the sky or landscape deserves more attention rather than dividing every photograph evenly.
Zooming Too Tightly on a Landmark
A distant landmark can be stronger when the surrounding landscape shows where it sits within the scene.
Treating Haze as a Failure
Atmosphere can create depth, mood and an honest representation of coastal conditions.
Using Panorama Mode for Every Wide Scene
A normal wide photograph is often stronger when the important elements already fit within one frame.
Taking Risks for the View
No composition is worth crossing barriers, approaching an unstable edge or standing somewhere unsafe.
Quick Coastal Photography Checklist
Coastal and Panoramic Photography FAQ
How do beginners take better coastal landscape photos?
Start with a safe viewpoint, look for a foreground element, keep the horizon straight and identify a natural line or recognizable subject that helps guide the viewer through the scene. Avoid trying to include every visible element simply because the view is large.
Do I need panorama mode to take a panoramic-looking photograph?
No. A normal wide photograph can create a panoramic feeling through composition, depth and horizontal space. Use panorama mode when the important view truly extends beyond what a standard frame can show effectively.
Where should the horizon be in a coastal photograph?
There is no single correct position. If the sky is dramatic, give it more of the frame. If the foreground, water or coastline provides the stronger visual story, position the horizon higher and give more space to the landscape below it.
How do you create depth in a wide landscape photograph?
Look for visual layers. A foreground cliff, rock or plant can establish the near distance, water or shoreline can form the middle ground and a bridge, island, mountain or horizon can provide the background.
How do you take a panorama with a smartphone?
Stand securely, decide where the panorama should begin and end, keep the phone level and rotate smoothly while following the on-screen guide. Avoid stepping sideways while shooting and watch for moving subjects that may create stitching errors.
Is golden hour the best time for coastal photography?
Golden-hour light can add warmth and dimension, but it is not the only useful condition. Overcast skies, marine haze, fog and even brighter midday conditions can work when you compose and expose for the light you actually have.
How can I photograph a distant landmark without losing the sense of place?
Resist zooming so tightly that the surrounding landscape disappears. Give the landmark enough visual importance to be recognized while retaining coastline, water or other environmental elements that explain where it is.
Do I need a tripod for coastal panoramas?
No. A tripod can help in low light or when stitching multiple separate photographs, but many strong coastal landscapes and smartphone panoramas can be made handheld with careful technique and a stable stance.
Light Can Completely Change the Same Landscape
Once you are comfortable composing a wide landscape, the next challenge is learning how changing light affects the scene.
My guide to Mastering Sunset Photography focuses specifically on photographing rapidly changing sunset light with a camera or smartphone.
Give the View a Beginning, Middle and Distance
The goal of a panoramic coastal photograph is not simply to show how much scenery was in front of you.
Look for the structure inside the view.
Find the foreground. Follow the coastline. Notice how the light separates the layers. Decide where the eye should travel and what deserves to remain in the frame.
Then make the photograph before changing positions and looking again for the smaller details that help tell the rest of the story.
A huge landscape becomes a stronger photograph when every part of the frame has a reason to be there.
About Angela
Angela Addington is the travel photographer and writer behind Lenses & Latitudes. She shares firsthand destination guidance and practical photography advice for independent and solo travelers, women over 50, road-trippers and weekend explorers. Learn more about Angela.