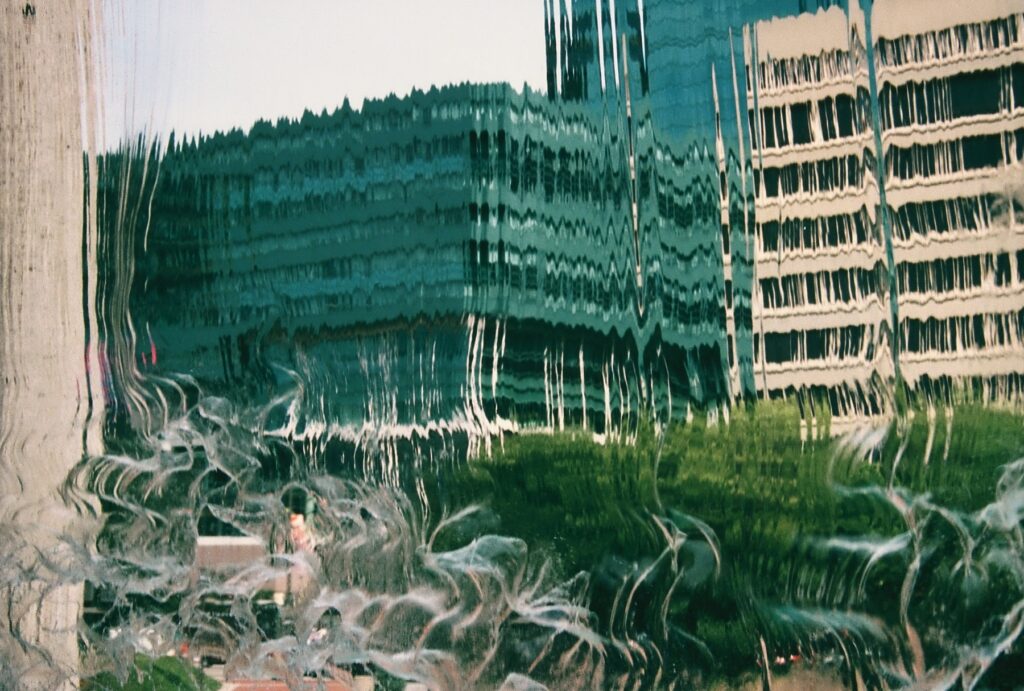
Falling water turns a familiar downtown skyline into a softer, fluid view filled with movement and atmosphere.
Through the Curtain: Finding Beauty in Distorted Views
A perfectly clear view is not always the most interesting one. Water, glass, fog and other layers can reshape a familiar scene and turn documentation into atmosphere.
This photograph was made from behind a waterfall. Instead of waiting for a clean view of the skyline, I let the moving water become part of the image.
How Do You Use Distortion Creatively in Travel Photography?
Place water, glass, fog, mesh, branches or another translucent layer between your camera and the subject, then compose around the shapes, blur and movement that layer creates instead of trying to make the scene perfectly clear.
The purpose is not to hide the destination.
It is to show it differently.
A landmark may still be recognizable, but the foreground layer adds atmosphere, movement or a sense of how the moment actually felt.
Think beyond sharpness. If distortion helps communicate mist, rain, motion, mystery or energy, it may be doing exactly what the photograph needs.
Distorted-View Photography at a Glance
The Skyline Behind the Waterfall
What would normally have been a clean downtown skyline became something completely different because I photographed it through falling water.
The buildings were still there.
But the waterfall changed the way they appeared.
Edges softened. Straight architectural lines became fluid. Movement in the foreground interrupted the static skyline.
The result felt less like a straightforward city photograph and more like a memory of standing behind rushing water while looking outward.
That distinction matters in travel photography.
You are not limited to documenting what a place looks like. You can also photograph what being there felt like.
Look for Something to Photograph Through
You do not need a filter attached to the front of your lens. The environment can create one for you.
Water
Falling water, fountains, wet windows and rain can bend shapes, soften detail and create movement across an otherwise static scene.
Glass
Windows can add reflections or subtle haze, while textured or curved glass may noticeably reshape the subject behind it.
Fog and Mist
Reduced visibility can separate layers of a landscape and create atmosphere that would disappear on a perfectly clear day.
Branches and Leaves
Natural foreground elements can partially obscure the scene and create a feeling of looking into or discovering the subject.
Fences and Mesh
When safely and appropriately used, repeating patterns can become part of the foreground rather than merely an obstacle.
Unexpected Surfaces
Even sunglasses, translucent materials or a rain-covered shelter can change the color and texture of a familiar view.
Do Not Just Capture the Landmark
A technically perfect view may explain where you were. A creative layer can help explain how the moment felt.
Was the air misty?
Was water roaring beside you?
Was the skyline partly hidden?
Did rain soften the streets or make the city lights glow?
Those conditions are part of the destination experience.
Instead of automatically trying to remove them from the frame, consider using them.
The waterfall image works because the obstruction is not a mistake. The water is part of the story of where the camera was positioned.
Blur and Distortion Are Not Always Problems
Not every successful travel photograph needs to be tack-sharp from edge to edge.
Blur can communicate movement.
Distortion can communicate the surface you are looking through.
Shadows can add mystery.
Partial visibility can invite the viewer to look more carefully.
The question is not simply whether the image is technically imperfect.
The better question is whether that imperfection helps communicate something useful about the scene.
Where Should You Focus When Shooting Through Something?
Decide first whether the foreground layer or the subject behind it is more important.
If you want the destination itself to remain recognizable, tap or focus on the background subject and allow the foreground layer to soften.
If the texture of droplets, mesh or glass is the subject, focus on that nearer surface instead.
You can also make both versions and compare them later.
Do not assume autofocus will understand your idea. Water and glass can confuse a camera, so deliberately choose where you want the viewer’s eye to land.
Use the Obstruction as a Frame Within the Frame
A natural barrier does not have to cover the entire photograph.
It can sit along one edge, across the top or around part of the subject.
Branches, arches, water and other foreground layers can create a visual opening that directs attention toward the destination beyond them.
This is especially useful at popular viewpoints where the obvious photograph has already been made countless times.
Instead of simply centering the landmark, look for something in the environment that helps shape the viewer’s path into the scene.
Decide How Much Distortion You Want
Keep the Subject Clear
Use a small amount of foreground texture while keeping the main landmark easy to recognize.
Let Both Layers Matter
Allow the foreground water, glass or foliage to become visible while still maintaining enough background detail to establish place.
Let the Layer Take Over
Use heavy distortion when shape, color and movement become more important than immediately identifying the destination.
Use Your Phone to Experiment Quickly
A smartphone is especially useful for this kind of photography because you can move it close to glass, water-covered surfaces and unusual openings.
Clean the lens first.
Tap the background subject if you want it recognizable, or tap the foreground layer when its texture is more important.
Try several exposure levels when bright water or sky dominates the frame.
Move the phone slightly left, right, up or down and watch how the obstruction changes.
Make several photographs rather than depending on one frame, especially when water or fog is moving.
You Do Not Need Complicated Gear
The success of this technique comes more from where you stand and what you notice than from which camera you carry.
The original photograph was made with a simple camera.
The important decision was standing behind the waterfall and recognizing that the water itself could become part of the image.
Whatever camera you carry, give yourself permission to experiment.
Look up.
Crouch down.
Peek through an opening.
Move behind something instead of always photographing from the clearest possible viewpoint.
The 10-Minute Shoot-Through Challenge
Give yourself 10 minutes during your next outing to photograph only through or around something.
The goal is not to create five perfect photographs. It is to train yourself to stop treating every obstruction as something that must be removed.
Change What Stands Between the Camera and the Subject
This article focuses on photographing through natural or physical layers.
For a broader look at changing angle, distance and reflective viewpoint, read Reflecting on Perspective: Finding the Unexpected Through the Lens.
For another example of distortion through glass and water, explore Car Wash Photography: How to Create Abstract Art with Your Phone.
Common Distorted-View Photography Mistakes
Assuming Every Obstruction Is a Problem
Before moving for a perfectly clear view, consider whether the foreground layer could actually improve the photograph.
Letting Autofocus Choose Randomly
Water, mesh and glass can confuse autofocus. Decide whether the foreground or background should be sharpest.
Adding Distortion Without Purpose
The barrier should contribute mood, movement, framing or texture—not simply make the photograph harder to understand.
Trying to Make Everything Sharp
Some softness can strengthen the feeling of water, fog, movement or distance.
Forgetting the Main Subject
When place matters, keep enough recognizable detail that the viewer still understands what they are seeing.
Overediting the Distortion
Do not remove the very texture or haze that made the scene interesting in the first place.
Ignoring Safety
Do not climb, lean over barriers or enter unsafe areas just to photograph through a more dramatic foreground.
Making Only One Version
Move slightly and compare several levels of distortion before deciding which composition works best.
Quick Distorted-View Photography Checklist
Creative Distortion Photography FAQ
How do you photograph through water?
Position the water between the camera and subject, then decide whether you want the background or the water itself in sharper focus. Make several frames because moving water changes the distortion continuously.
How do you photograph through glass?
Move the camera close to the glass when appropriate, watch for unwanted reflections and choose your focus point deliberately. Textured or wet glass can also be used intentionally for distortion.
Can blurry travel photos still be good?
Yes. Blur can work when it communicates movement, weather, atmosphere or emotion. The important distinction is whether the blur supports the photograph rather than appearing accidental and distracting.
What can be used as a natural photography filter?
Water, fog, rain-covered windows, glass, branches, leaves, mesh and other translucent or partially obstructing surfaces can all change how a scene appears.
Should the foreground or background be in focus?
Either can work. Focus on the background when the destination needs to remain recognizable. Focus on the foreground when its texture or pattern is the main visual idea.
Can I use this technique with a smartphone?
Yes. Smartphones are especially easy to move close to glass or unusual openings. Tap the exact area you want sharp and make multiple frames when the foreground layer is moving.
What is frame-within-a-frame photography?
It is a composition technique where an element inside the scene—such as branches, an arch, a doorway or water—creates a visual boundary around the main subject.
How much distortion is too much?
If the viewer can no longer understand the intended subject or the distortion adds nothing to the mood, composition or story, simplify the foreground or try a different angle.
Build Stronger Travel Photography Skills
Creative distortion is one way to move beyond straightforward documentation while traveling.
For broader guidance on composition, lighting, smartphones, focus and visual storytelling, visit my complete Travel Photography Tips guide.
A Clear View Is Not Always the Better View
The waterfall did not ruin the skyline photograph. It became the reason the photograph was worth making.
When you travel, it is easy to search constantly for the unobstructed viewpoint.
Make that photograph when you want it.
Then look again.
Photograph through the rain. Use the fog. Let a window soften the scene. Frame a landmark through branches. Allow moving water to bend a city into something more fluid.
Travel photography is not only about documenting where you are. It is also about showing how you saw it.
About Angela
Angela Addington is the travel photographer and writer behind Lenses & Latitudes. She shares firsthand destination guidance and practical photography advice for independent and solo travelers, women over 50, road-trippers and weekend explorers. Learn more about Angela.